Kubernetes Gateway and Control Plane both in Kubernetes
Overview
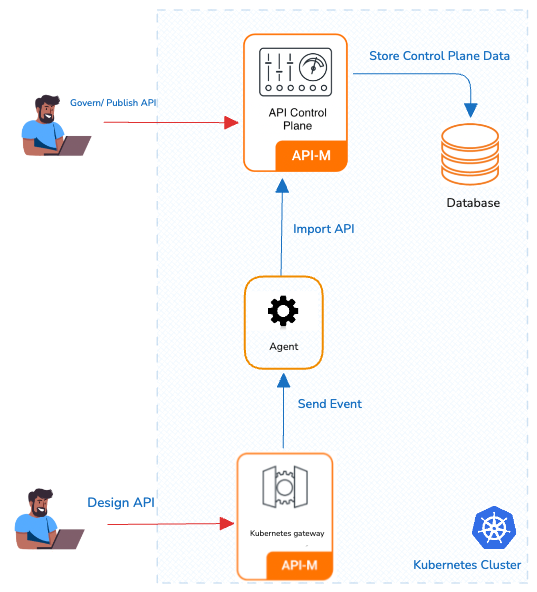
In this approach, both APK Dataplane and APIM are in a single kubernetes cluster. In this pattern APK dataplane will have visibility over all the namespace (or a predefined set of namespaces) in the cluster.
Advantages
- Resource Efficiency: This pattern maximizes resource utilization by allowing multiple components to coexist within the same cluster.
- Simplified Management: Managing a single cluster with multiple namespaces can be more straightforward compared to managing separate clusters.
Considerations
- Isolation: While namespaces provide a level of isolation, they may not offer the same level of isolation as separate clusters. Careful resource allocation and RBAC (Role-Based Access Control) policies are essential.
- APIM in K8s: Running APIM in a Kubernetes cluster may require additional resources and configurations compared to running it in a VM.
Deployment guideline
By default, WSO2 APK is configured to support the Data Plane Only Pattern. You can follow the below steps to do the deployment using this pattern.
Create Kubernetes namespace
kubectl create ns apk
Configure the hosts file
Add a hostname mapping to the /etc/hosts file as follows.
| IP | Domain name |
|---|---|
| 127.0.0.1 | api.am.wso2.com |
| 127.0.0.1 | am.wso2.com |
| 127.0.0.1 | idp.am.wso2.com |
| 127.0.0.1 | default.gw.wso2.com |
Setup WSO2 API Manager Control Plane 4.5.0
Setup WSO2 API Manager 4.5.0 in K8s cluster using Helm Charts.
-
Create a new helm repository with the latest apim release using the following command. Let’s consider the
<repository-name>aswso2apim.console helm repo add wso2apim https://github.com/wso2/helm-apim/releases/download/acp-4.5.0 -
Execute the following command to update the helm repositories.
console helm repo update -
Consider
apimas the<chart-name>for this guide. As the--versionof this command, use the version of the release you used in point 1 above. It will take a few minutes for the deployment to complete.helm install apim wso2apim/wso2am-acp --version 4.5.0-1 -f https://raw.githubusercontent.com/wso2/apk/main/helm-charts/samples/apim/cp/apk-cp/4.5.0-values.yaml -n apkhelm install <chart-name> <repository-name>/wso2am-acp --version <version-of-APIM> -f <path-to-values.yaml-file> -
Install NGINX Ingress Controller. Please refer to the NGINX Ingress Controller documentation for more information.
Note
Please refer to the Advanced Configuration for APIM for more information.
Setup WSO2 Kubernetes Gateway 1.3.0
-
Create a new helm repository with the latest Kubernetes Gateway release using the following command. Let’s consider the
<repository-name>aswso2apk.console helm repo add wso2apk https://github.com/wso2/apk/releases/download/1.3.0-1 -
Execute the following command to update the helm repositories.
console helm repo update -
Install the Kubernetes Gateway components and start WSO2 API Platform For Kubernetes. Consider
apkas the<chart-name>for this guide. As the--versionof this command, use the version of the release you used in point 1 above. It will take a few minutes for the deployment to complete.helm install apk wso2apk/apk-helm --version 1.3.0 -f https://raw.githubusercontent.com/wso2/apk/main/helm-charts/samples/apk/1.3.0-values.yaml -n apkhelm install <chart-name> <repository-name>/apk-helm --version <version-of-APK> -f <path-to-values.yaml-file>
Note
If you wish to change the default hostname and vhost change the following values.yaml configurations. Lets say you want to deploy a production environment and you have a domain name example.com and you want to expose your API's through prod.gw.example.com and expose Kubernetes Gateway system APIs through prod.apk.example.com then
- wso2.apk.listener.hostname: 'prod.apk.example.com'
- wso2.apk.dp.gateway.listener.hostname: 'gw.example.com'
- wso2.apk.dp.configdeployer.vhosts: [{"hosts":["gw.example.com"],"name":"prod","type":"production"}]
Note
If you wish to specify a predefined set of namespaces for monitoring, you can configure the wso2.apk.dp.adapter.configs.apiNamespaces variable in the values.yaml file. For example, if you want the dataplane to monitor only the ns-1 and ns-2 namespaces, you can set it as follows:
yaml
Wso2:
  apk:
    dp:
      adapter:
        configs:
          apiNamespaces:
          - "ns-1"
          - "ns-2"
      commonController:
        configs:
          apiNamespaces:
          - "ns-1"
          - "ns-2"
Note
Please refer to the Advanced Configuration for APIM for more information.
Setup WSO2 Kubernetes Gateway Agent 1.3.0
-
Create a new helm repository with the latest kubernetes gateway agent release using the following command. Let’s consider the
<repository-name>aswso2apkagentfor this guide.console helm repo add wso2apkagent https://github.com/wso2/product-apim-tooling/releases/download/1.3.0 -
Execute the following command to update the helm repositories.
console helm repo update -
Install the Kubernetes Gateway Agent components and start WSO2 API Platform For Kubernetes. Consider
apkas the<chart-name>for this guide. As the--versionof this command, use the version of the release you used in point 1 above. It will take a few minutes for the deployment to complete.helm install apim-apk-agent wso2apkagent/apim-apk-agent --version 1.3.0 -f https://raw.githubusercontent.com/wso2/apk/main/helm-charts/samples/apim-apk-agent/cp/1.3.0-values.yaml -n apkhelm install <chart-name> <repository-name>/apim-apk-agent --version <version-of-APK-Agent> -f <path-to-values.yaml-file>
Note
Please refer to the Advanced Configuration for Agent for more information.
Verify the deployment
Now you can verify the deployment by executing the following command. You will see the status of the pods as follows once completed.
kubectl get pods -n apk
This approach is recommended for all Production, Dev, Test, and UAT environments. Here a seperate kubernetes cluster is required for each environment.