Deploying & Invoking a managed API on WSO2 Kubernetes Gateway
This guide provides a step-by-step approach to installing, deploying, and invoking an API using the WSO2 Kubernetes Gateway .
Prerequisites
Note
If you already have an installation of the Kubernetes Gateway in your cluster, please remove the installation by following the steps specified in the Uninstall Kubernetes Gateway section.
Before setting up Kubernetes Gateway, we need to:
- Set up a Kubernetes cluster
- Install kubectl, a command line tool for communicating with a Kubernetes cluster's control plane using the Kubernetes API
- Install Helm to deploy Kubernetes Gateway components in the Kubernetes cluster we create.
This guide uses Rancher Desktop for setting up a local Kubernetes cluster, to ensure that you can follow along without needing a cloud-based Kubernetes environment. However, you can use Minikube, Docker Desktop, or any other Kubernetes environment you prefer.
For a streamlined setup on your local desktop environment, follow the steps below:
Install Kubernetes Locally
Rancher Desktop provides a full Kubernetes environment and can be used for local development.
- Install Rancher Desktop and ensure Kubernetes is enabled in the settings.
- Install kubectl to interact with your cluster:
- Verify that Rancher Desktop is running and that kubectl can communicate with the cluster:
kubectl cluster-info
Kubernetes control plane is running at https://127.0.0.1:6443
CoreDNS is running at https://127.0.0.1:6443/api/v1/namespaces/kube-system/services/kube-dns:dns/proxy
Metrics-server is running at https://127.0.0.1:6443/api/v1/namespaces/kube-system/services/https:metrics-server:https/proxy
Note
If you face any issues with the installation, refer to the Rancher Desktop Troubleshooting guide. Also, refer to the FAQ for more common issues faced on setting up Rancher.
Tip
If you are using a different Kubernetes environment, ensure that you have a working Kubernetes cluster and kubectl installed.
Note
Please refer to the prerequisites for setting cluster resources.
Install Helm
Install Helm in order to deploy Kubernetes Gateway.
Ensure that Helm is installed correctly by running the following command:
helm version
version.BuildInfo{Version:"v3.17.1", GitCommit:"980d8ac1939e39138101364400756af2bdee1da5", GitTreeState:"clean", GoVersion:"go1.23.5"}
Step 1: Install & Start WSO2 Kubernetes Gateway
Add Kubernetes Gateway Helm Repository
Adding the Kubernetes Gateway Helm repository allows your system to fetch and install the latest Kubernetes Gateway components from the remote repository. This ensures that you are always using the most up-to-date version of Kubernetes Gateway.
```console helm repo add wso2apk https://github.com/wso2/apk/releases/download/1.3.0-1
helm repo update ```
Install Kubernetes Gateway Components
Next, install the Kubernetes Gateway components to set up the necessary infrastructure to manage and deploy APIs within your Kubernetes cluster.
Install the Kubernetes Gateway components and start the WSO2 API Platform For Kubernetes. Consider apk as the <chart-name> for this guide. Use the version of the release you added in Step 1.
helm install apk wso2apk/apk-helm --version 1.3.0-1 -f https://raw.githubusercontent.com/wso2/apk/refs/heads/main/helm-charts/samples/apk/1.3.0-qsg-values.yaml
Optional
To commence the installation while making use of the customization capabilities inherent in the values.yaml file, follow the subsequent command format. Instructions in the customize configurations section will guide you through the process of acquiring the values.yaml file.
helm install apk wso2apk/apk-helm --version 1.3.0-1 -f values.yaml
helm install <chart-name> <repository-name>/apk-helm --version <version-of-APK> -f <path-to-values.yaml-file>
Optional
If you want to update an existing Kubernetes Gateway installation, use the following Helm upgrade command. The --no-hooks flag disables the hooks available in the Kubernetes Gateway Helm chart.
helm upgrade apk wso2apk/apk-helm --version 1.3.0-1-f values.yaml --no-hooks
helm upgrade <chart-name> <repository-name>/apk-helm --version <version-of-APK> -f <path-to-values.yaml-file> --no-hooks
Verify the deployment
Verifying the deployment confirms that all Kubernetes Gateway components are successfully installed and running as expected. If any issues arise, troubleshooting them at this stage ensures a smooth API deployment process. Check the status of deployed pods:
kubectl get pods
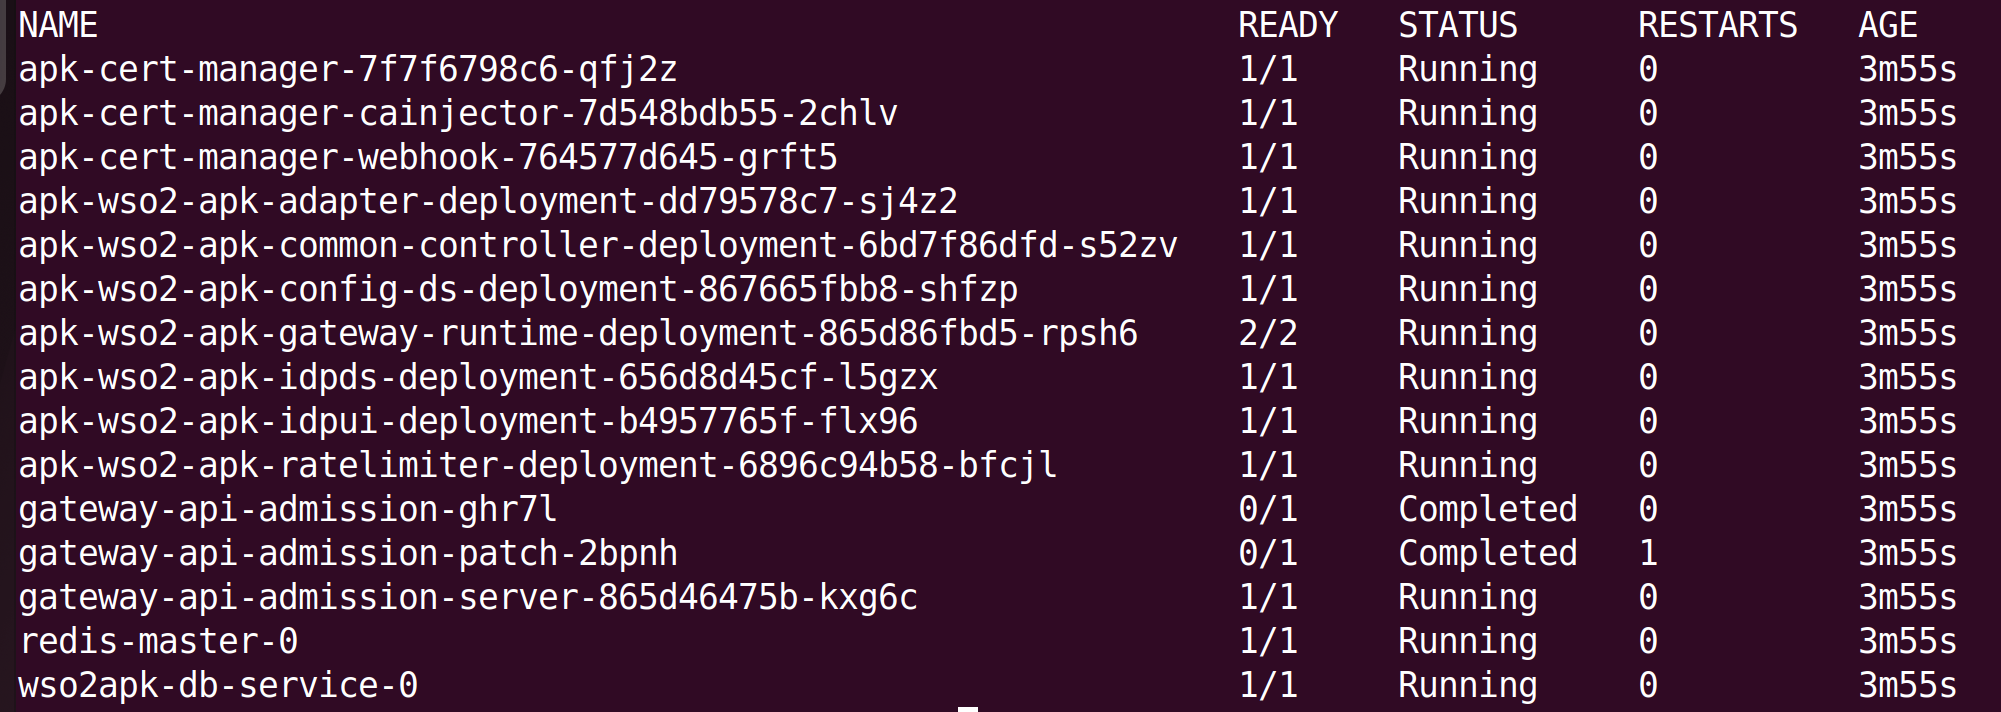
Important
Except for the gateway-apim-admission and gateway-apim-admission-patch (which will run as soon as Kubernetes Gateway is installed and then complete), all other pods should transition to the running state. If they have not, please refer the FAQs to troubleshoot the problem.
Map API Hostnames to Your Local System
To ensure that your local machine correctly resolves API requests, you need to map the API hostnames to 127.0.0.1. This is done by modifying your system's hosts file.
For macOS/Linux:
-
Open a terminal and run the following command to edit the hosts file:
sudo nano /etc/hosts -
Add the following lines at the end of the file:
127.0.0.1 api.example.com 127.0.0.1 idp.example.com 127.0.0.1 default.gw.example.com -
Save the file (CTRL + X, then Y, then Enter).
-
Flush the DNS cache (optional but recommended):
sudo dscacheutil -flushcache  # macOS
sudo systemctl restart nscd   # Linux (if using nscd)
For Windows:
- Open Notepad as Administrator.
-
Navigate to C:\Windows\System32\drivers\etc\hosts. Add the following lines at the end of the file:
127.0.0.1 api.example.com 127.0.0.1 idp.example.com 127.0.0.1 default.gw.example.com -
Save the file and restart your computer (or run ipconfig /flushdns in Command Prompt to apply changes immediately).
(Optional) To access the deployment through your local machine:
To interact with the deployed API from your local machine, you need to expose the gateway service and route traffic appropriately. This involves identifying the external IP of the gateway service and setting up a port forward to access it locally.
-
Identify the
gateway-serviceexternal IP address.Find the external IP address assigned to the API gateway service, which allows external access to the deployed APIs.
console
kubectl get svc | grep gateway-service
2. Port forward router service to localhost.If your cluster does not provide an external IP, you can use port forwarding to make the API gateway accessible from your local machine.
console
kubectl port-forward svc/apk-wso2-apk-gateway-service 9095:9095
Step 2: Configure the Managed API for a Sample Backend Service
Download and save the SampleAPIDefinition.json file, which contains the OpenAPI Specification (OAS) definition for the API that corresponds to the backend service that we previously deployed. This definition will be used to deploy the API in Kubernetes Gateway. Use the following command to download the file:
curl -O https://raw.githubusercontent.com/wso2/docs-apk/refs/heads/1.3.0/en/docs/assets/files/get-started/SampleAPIDefinition.json
Then, verify the file exists:
cat SampleAPIDefinition.json
{
    "openapi": "3.0.1",
    "info": {
        "title": "Sample API",
        "description": "A set of helpers inspired by httpbin.org",
        "version": "0.1.0"
    },
    "servers": [
        {
        "url": "https://dev-tools.wso2.com/gs/helpers/v1.0"
        }
    ],
    "tags": [
        {
        "name": "echo",
        "description": "Echo data from the HTTP request"
        },
        {
        "name": "dynamic",
        "description": "Dynamic data generation"
        },
        {
        "name": "convert",
        "description": "Convert data across various formats"
        },
        {
        "name": "AI",
        "description": "Leverage AI to transform and validate data"
        }
    ],
    "paths": {
        "/ai/spelling": {
        "post": {
            "operationId": "postAiSpelling",
            "requestBody": {
            "content": {
                "application/json": {
                "schema": {
                    "$ref": "#/components/schemas/ai_spelling_payload"
                }
                }
            },
            "required": true
            },
            "responses": {
            "200": {
                "description": "Ok",
                "content": {
                "application/json": {
                    "schema": {
                    "$ref": "#/components/schemas/ai_spelling_response"
                    }
                }
                }
            },
            "400": {
                "description": "BadRequest",
                "content": {
                "application/json": {
                    "schema": {
                    "oneOf": [
                        {
                        "$ref": "#/components/schemas/error_response"
                        },
                        {
                        "$ref": "#/components/schemas/ErrorPayload"
                        }
                    ]
                    }
                }
                }
            },
            "500": {
                "description": "InternalServerError",
                "content": {
                "application/json": {
                    "schema": {
                    "$ref": "#/components/schemas/ErrorPayload"
                    }
                }
                }
            }
            }
        }
        },
        "/base64/decode/{value}": {
        "post": {
            "tags": [
            "convert"
            ],
            "summary": "Decodes base64url-encoded string.",
            "parameters": [
            {
                "name": "value",
                "in": "path",
                "required": true,
                "schema": {
                "maxLength": 500,
                "pattern": "^[0-9a-zA-Z=]+$",
                "type": "string",
                "default": "QmFsbGVyaW5hIGlzIGF3ZXNvbWUh"
                }
            }
            ],
            "responses": {
            "200": {
                "description": "Decoded base64 content.",
                "content": {
                "application/json": {
                    "schema": {
                    "$ref": "#/components/schemas/base64_response"
                    }
                }
                }
            },
            "400": {
                "$ref": "#/components/responses/error"
            }
            }
        }
        },
        "/base64/encode/{value}": {
        "post": {
            "tags": [
            "convert"
            ],
            "summary": "Base64 encode input string .",
            "parameters": [
            {
                "name": "value",
                "in": "path",
                "required": true,
                "schema": {
                "maxLength": 500,
                "pattern": "^[0-9a-zA-Z\\s!$-_]+$",
                "type": "string",
                "default": "Ballerina is awesome!"
                }
            }
            ],
            "responses": {
            "200": {
                "description": "Encoded base64 content.",
                "content": {
                "application/json": {
                    "schema": {
                    "$ref": "#/components/schemas/base64_response"
                    }
                }
                }
            },
            "400": {
                "$ref": "#/components/responses/error"
            }
            }
        }
        },
        "/ip": {
        "get": {
            "tags": [
            "echo"
            ],
            "summary": "Returns the client IP address.",
            "responses": {
            "200": {
                "description": "Get the client IP address.",
                "content": {
                "application/json": {
                    "schema": {
                    "$ref": "#/components/schemas/ip_response"
                    }
                }
                }
            },
            "404": {
                "$ref": "#/components/responses/error"
            }
            }
        }
        },
        "/user-agent": {
        "get": {
            "tags": [
            "echo"
            ],
            "summary": "Return the User-Agent header value",
            "responses": {
            "200": {
                "description": "Get the request User-Agent header value.",
                "content": {
                "application/json": {
                    "schema": {
                    "$ref": "#/components/schemas/ua_response"
                    }
                }
                }
            },
            "404": {
                "$ref": "#/components/responses/error"
            }
            }
        }
        },
        "/uuid": {
        "get": {
            "tags": [
            "dynamic"
            ],
            "summary": "Returns a unique ID as per UUID v4 spec",
            "responses": {
            "200": {
                "description": "Get a UUID V4.",
                "content": {
                "application/json": {
                    "schema": {
                    "$ref": "#/components/schemas/uuid_response"
                    }
                }
                }
            },
            "default": {
                "$ref": "#/components/responses/error"
            }
            }
        }
        }
    },
    "components": {
        "schemas": {
        "ip_response": {
            "type": "object",
            "additionalProperties": false,
            "properties": {
            "origin": {
                "maxLength": 64,
                "pattern": "^[0-9\\.]+$",
                "type": "string"
            }
            }
        },
        "base64_response": {
            "type": "object",
            "additionalProperties": false,
            "properties": {
            "value": {
                "maxLength": 100,
                "pattern": "^[0-9\\.]+$",
                "type": "string"
            }
            }
        },
        "ua_response": {
            "type": "object",
            "additionalProperties": false,
            "properties": {
            "user-agent": {
                "maxLength": 1000,
                "pattern": "^[0-9a-zA-Z_\\-\\/,();\\.\\s]+$",
                "type": "string"
            }
            }
        },
        "uuid_response": {
            "type": "object",
            "additionalProperties": false,
            "properties": {
            "uuid": {
                "maxLength": 36,
                "minLength": 36,
                "pattern": "^[a-fA-F0-9]{8}-[a-fA-F0-9]{4}-[a-fA-F0-9]{4}-[a-fA-F0-9]{4}-[a-fA-F0-9]{12}$",
                "type": "string"
            }
            }
        },
        "error_response": {
            "type": "object",
            "additionalProperties": false,
            "properties": {
            "message": {
                "maxLength": 50,
                "type": "string"
            },
            "code": {
                "maxLength": 10,
                "type": "string"
            }
            }
        },
        "ai_spelling_payload": {
            "required": [
            "text"
            ],
            "type": "object",
            "properties": {
            "text": {
                "maxLength": 100,
                "pattern": "^[\\w\\s]+$",
                "type": "string"
            }
            }
        },
        "ai_spelling_response": {
            "required": [
            "correctedText"
            ],
            "type": "object",
            "properties": {
            "correctedText": {
                "maxLength": 150,
                "pattern": "^[\\w\\s]+$",
                "type": "string"
            }
            }
        },
        "ErrorPayload": {
            "required": [
            "message",
            "method",
            "path",
            "reason",
            "status",
            "timestamp"
            ],
            "type": "object",
            "properties": {
            "timestamp": {
                "type": "string"
            },
            "status": {
                "type": "integer",
                "format": "int64"
            },
            "reason": {
                "type": "string"
            },
            "message": {
                "type": "string"
            },
            "path": {
                "type": "string"
            },
            "method": {
                "type": "string"
            }
            }
        }
        },
        "responses": {
        "error": {
            "description": "Response for any error",
            "content": {
            "application/json": {
                "schema": {
                "$ref": "#/components/schemas/error_response"
                }
            }
            }
        }
        }
    }
}
Generate Kubernetes Gateway Configuration File from the OpenAPI Definition
In addition to the OpenAPI definition file, we need a Kubernetes Gateway configuration file (apk-conf) that defines metadata and settings for the API. Kubernetes Gateway provides a configuration service that automatically generates this file from the OpenAPI definition. Execute the following command to generate the apk-conf file. Use the values provided in the table below in the body of your request.
| Field | Value |
|---|---|
| definition | SampleAPIDefinition.json file that was downloaded at the beginning of Step 3 |
curl -k --location 'https://api.example.com:9095/api/configurator/1.3.0/apis/generate-configuration' \
--header 'Host: api.example.com' \
--form 'definition=@"SampleAPIDefinition.json"' > SampleService.apk-conf
curl --location 'https://<host>:9095/api/configurator/1.3.0/apis/generate-configuration' \
--header 'Host: <host>' \
--form 'apiType="<api-type>"' \
--form 'definition=@"<path/to/SampleAPIDefinition.json>"'
The response will contain the Kubernetes Gateway configuration file content, which will be saved as SampleService.apk-conf. You can verify the saved content by running:
cat SampleService.apk-conf
```
name: "Sample API" basePath: "/U2FtcGxlIEFQSTAuMS4w" version: "0.1.0" type: "REST" defaultVersion: false subscriptionValidation: false endpointConfigurations: production: - endpoint: "https://dev-tools.wso2.com/gs/helpers/v1.0" operations: - target: "/ai/spelling" verb: "POST" secured: true scopes: [] - target: "/base64/decode/{value}" verb: "POST" secured: true scopes: [] - target: "/base64/encode/{value}" verb: "POST" secured: true scopes: [] - target: "/ip" verb: "GET" secured: true scopes: [] - target: "/user-agent" verb: "GET" secured: true scopes: [] - target: "/uuid" verb: "GET" secured: true scopes: [] ```
Customize the API Configuration
The generated apk-conf file can be modified to suit your needs. For instance, you can update the file to create a cleaner base path for the API from the default value to /sample-api. Change the file to include the line basePath: "/sample-api" as shown below:
Important
We recommend installing the Kubernetes Gateway Config Language Support Visual Studio Code (VS Code) extension to easily edit and validate the Kubernetes Gateway configuration file.
```
name: "Sample API" basePath: "/sample-api" version: "0.1.0" type: "REST" defaultVersion: false subscriptionValidation: false endpointConfigurations: production: - endpoint: "https://dev-tools.wso2.com/gs/helpers/v1.0" operations: - target: "/ai/spelling" verb: "POST" secured: true scopes: [] - target: "/base64/decode/{value}" verb: "POST" secured: true scopes: [] - target: "/base64/encode/{value}" verb: "POST" secured: true scopes: [] - target: "/ip" verb: "GET" secured: true scopes: [] - target: "/user-agent" verb: "GET" secured: true scopes: [] - target: "/uuid" verb: "GET" secured: true scopes: [] ```
Step 3: Generate Access Token
To deploy and manage APIs using Kubernetes Gateway, you need a valid access token issued by an identity provider (IdP). Kubernetes Gateway supports third-party IdPs such as Asgardeo and Auth0, but for this guide, we will use the inbuilt non-production IdP, which is only meant to be used for testing purposes.
Note
If you are using a different organization to the one used in this guide, you will have to create a TokenIssuer with the relevant organization name in Kubernetes Gateway before proceeding to the next step. You can use the Add Token Issuer to create a new token issuer.
We will use the Client Credentials Grant Type to obtain the access token. To do this, you must provide a client ID and client secret that have been generated beforehand.
Note
In this example, we use sample credentials from the built-in non-production identity provider. These should only be used for testing purposes.
Run the following command (with the provided values) to generate your access token:
curl -k --location 'https://idp.example.com:9095/oauth2/token' \
--header 'Host: idp.example.com' \
--header 'Authorization: Basic NDVmMWM1YzgtYTkyZS0xMWVkLWFmYTEtMDI0MmFjMTIwMDAyOjRmYmQ2MmVjLWE5MmUtMTFlZC1hZmExLTAyNDJhYzEyMDAwMg==' \
--header 'Content-Type: application/x-www-form-urlencoded' \
--data-urlencode 'grant_type=client_credentials' \
--data-urlencode 'scope=apk:api_create'
{"access_token":"eyJhbGciOiJSUzI1NiIsICJ0eXAiOiJKV1QiLCAia2lkIjoiZ2F0ZXdheV9jZXJ0aWZpY2F0ZV9hbGlhcyJ9.eyJpc3MiOiJodHRwczovL2lkcC5hbS53c28yLmNvbS90b2tlbiIsICJzdWIiOiI0NWYxYzVjOC1hOTJlLTExZWQtYWZhMS0wMjQyYWMxMjAwMDIiLCAiZXhwIjoxNjg4MTMxNDQ0LCAibmJmIjoxNjg4MTI3ODQ0LCAiaWF0IjoxNjg4MTI3ODQ0LCAianRpIjoiMDFlZTE3NDEtMDA0Ni0xOGE2LWFhMjEtYmQwYTk4ZjYzNzkwIiwgImNsaWVudElkIjoiNDVmMWM1YzgtYTkyZS0xMWVkLWFmYTEtMDI0MmFjMTIwMDAyIiwgInNjb3BlIjoiZGVmYXVsdCJ9.RfKQq2fUZKZFAyjimvsPD3cOzaVWazabmq7b1iKYacqIdNjkvO9CQmu7qdtrVNDmdZ_gHhWLXiGhN4UTSCXv_n1ArDnxTLFBroRS8dxuFBZoD9Mpj10vYFSDDhUfFqjgMqtpr30TpDMfee1wkqB6K757ZSjgCDa0hAbv555GkLdZtRsSgR3xWcxPBsIozqAMFDCWoUCbgTQuA5OiEhhpVco2zv4XLq2sz--VRoBieO12C69KnGRmoLuPtvOayInvrnV96Tbt9fR0fLS2l1nvAdFzVou0SIf9rMZLnURLVQQYE64GR14m-cFRYdUI9vTsFHZBl5w-uCLdzMMofzZaLQ", "token_type":"Bearer", "expires_in":3600, "scope":"apk:api_create"}
curl --location 'https://<host>:9095/oauth2/token' \
--header 'Host: <host>' \
--header 'Authorization: Basic <Base64Encoded(clientId:clientSecret)>' \
--header 'Content-Type: application/x-www-form-urlencoded' \
--data-urlencode 'grant_type=client_credentials'
--data-urlencode 'scope=apk:api_create'
Important
- The provided credentials and tokens are only for non-production use.
- The token expires after 3600 seconds (1 hour).
- If you are using a third-party IdP, refer to the Kubernetes Gateway Identity Provider Configuration Guide for setup details.
Now that you have a valid access token, you can proceed to deploy and invoke APIs using Kubernetes Gateway.
Step 4: Deploy and Invoke the API
You now have the API Definition (SampleAPIDefinition.json) and the apk-conf file (SampleService.apk-conf) corresponding to the API. We can use these files to deploy the API in Kubernetes Gateway.
Use the provided values in the table below in the body of your request.
| Field | Value | Required |
|---|---|---|
| apkConfiguration | SampleService.apk-conf file |
|
| definitionFile | SampleAPIDefinition.json file |
Replace
curl -k --location 'https://api.example.com:9095/api/deployer/1.3.0/apis/deploy' \
--header 'Host: api.example.com' \
--header 'Authorization: Bearer eyJhbGciOiJSUzI1NiIsICJ0eXAiOiJKV1QiLCAia2lkIjoiZ2F0ZXdheV9jZXJ0aWZpY2F0ZV9hbGlhcyJ9.eyJpc3MiOiJodHRwczovL2lkcC5hbS53c28yLmNvbS90b2tlbiIsICJzdWIiOiI0NWYxYzVjOC1hOTJlLTExZWQtYWZhMS0wMjQyYWMxMjAwMDIiLCAiZXhwIjoxNjg4MTMxNDQ0LCAibmJmIjoxNjg4MTI3ODQ0LCAiaWF0IjoxNjg4MTI3ODQ0LCAianRpIjoiMDFlZTE3NDEtMDA0Ni0xOGE2LWFhMjEtYmQwYTk4ZjYzNzkwIiwgImNsaWVudElkIjoiNDVmMWM1YzgtYTkyZS0xMWVkLWFmYTEtMDI0MmFjMTIwMDAyIiwgInNjb3BlIjoiZGVmYXVsdCJ9.RfKQq2fUZKZFAyjimvsPD3cOzaVWazabmq7b1iKYacqIdNjkvO9CQmu7qdtrVNDmdZ_gHhWLXiGhN4UTSCXv_n1ArDnxTLFBroRS8dxuFBZoD9Mpj10vYFSDDhUfFqjgMqtpr30TpDMfee1wkqB6K757ZSjgCDa0hAbv555GkLdZtRsSgR3xWcxPBsIozqAMFDCWoUCbgTQuA5OiEhhpVco2zv4XLq2sz--VRoBieO12C69KnGRmoLuPtvOayInvrnV96Tbt9fR0fLS2l1nvAdFzVou0SIf9rMZLnURLVQQYE64GR14m-cFRYdUI9vTsFHZBl5w-uCLdzMMofzZaLQ' \
--form 'apkConfiguration=@"SampleService.apk-conf"' \
--form 'definitionFile=@"SampleAPIDefinition.json"'
```
id: "2d43a29159fbc77652b687243d545a7038c3abd6" name: "Sample API" basePath: "/sample-api" version: "0.1.0" type: "REST" defaultVersion: false subscriptionValidation: false endpointConfigurations: production: - endpoint: "https://dev-tools.wso2.com/gs/helpers/v1.0" operations: - target: "/ai/spelling" verb: "POST" secured: true scopes: [] - target: "/base64/decode/{value}" verb: "POST" secured: true scopes: [] - target: "/base64/encode/{value}" verb: "POST" secured: true scopes: [] - target: "/ip" verb: "GET" secured: true scopes: [] - target: "/user-agent" verb: "GET" secured: true scopes: [] - target: "/uuid" verb: "GET" secured: true scopes: []
```
curl --location 'https://<host>:9095/api/deployer/1.3.0/apis/deploy' \
--header 'Host: <host>' \
--header 'Authorization: Bearer <access-token>' \
--form 'apkConfiguration=@"path/to/SampleService.apk-conf"' \
--form 'definitionFile=@"path/to/SampleAPIDefinition.json"'
Execute the command below. You will be able to see that the Sample API is successfully deployed as shown in the image.
kubectl get apis

Now the API is ready to be invoked. Let’s get a random UUID by invoking the /uuid resource in the Sample API.
To invoke the API, replace
curl -k --location 'https://default.gw.example.com:9095/sample-api/0.1.0/uuid' \
--header 'Host: default.gw.example.com' \
--header 'Authorization: Bearer eyJhbGciOiJSUzI1NiIsICJ0eXAiOiJKV1QiLCAia2lkIjoiZ2F0ZXdheV9jZXJ0aWZpY2F0ZV9hbGlhcyJ9.eyJpc3MiOiJodHRwczovL2lkcC5hbS53c28yLmNvbS90b2tlbiIsICJzdWIiOiI0NWYxYzVjOC1hOTJlLTExZWQtYWZhMS0wMjQyYWMxMjAwMDIiLCAiZXhwIjoxNjg4MTMxNDQ0LCAibmJmIjoxNjg4MTI3ODQ0LCAiaWF0IjoxNjg4MTI3ODQ0LCAianRpIjoiMDFlZTE3NDEtMDA0Ni0xOGE2LWFhMjEtYmQwYTk4ZjYzNzkwIiwgImNsaWVudElkIjoiNDVmMWM1YzgtYTkyZS0xMWVkLWFmYTEtMDI0MmFjMTIwMDAyIiwgInNjb3BlIjoiZGVmYXVsdCJ9.RfKQq2fUZKZFAyjimvsPD3cOzaVWazabmq7b1iKYacqIdNjkvO9CQmu7qdtrVNDmdZ_gHhWLXiGhN4UTSCXv_n1ArDnxTLFBroRS8dxuFBZoD9Mpj10vYFSDDhUfFqjgMqtpr30TpDMfee1wkqB6K757ZSjgCDa0hAbv555GkLdZtRsSgR3xWcxPBsIozqAMFDCWoUCbgTQuA5OiEhhpVco2zv4XLq2sz--VRoBieO12C69KnGRmoLuPtvOayInvrnV96Tbt9fR0fLS2l1nvAdFzVou0SIf9rMZLnURLVQQYE64GR14m-cFRYdUI9vTsFHZBl5w-uCLdzMMofzZaLQ'
{
    "uuid":"f4a38d31-21e8-4b5d-9c26-792e6805dd54"
}
curl --location 'https://<host>:9095/<basePath>/0.1.0/uuid' \
--header 'Host: <host>' \
--header 'Authorization: Bearer <access-token>'
Conclusion
Congratulations! You have successfully:
- Set up your Kubernetes environment and deployed WSO2 Kubernetes Gateway.
- Deployed a backend service inside Kubernetes.
- Configured and deployed a managed API for the backend service.
- Generated an access token to authenticate API requests.
- Successfully invoked the API and received a response.
This Quick Start Guide covered the essential steps to get your first API up and running with WSO2 Kubernetes Gateway. For advanced topics such as API security, rate limiting, analytics, and custom policies, check out the WSO2 Kubernetes Gateway Documentation.