gRPC API Management with WSO2 Kubernetes Gateway
Introduction
gRPC is a modern, open-source, high-performance RPC (Remote Procedure Call) framework that can run in any environment. It is designed to allow a client application to directly call a method on a server application located on a different machine, as if it were a local object. It supports both synchronous and asynchronous communication, and is ideal for use cases that require high performance and minimal latency.
Even with gRPC’s performance benefits, running an API without proper governance is risky. You need proper API management with added features like authentication, rate limiting, policy enforcement, and analytics. This is where WSO2 Kubernetes Gateway comes in, by providing all of these features necessary to properly manage and expose gRPC APIs to your consumers.
Similar to how REST APIs use OpenAPI specifications, gRPC APIs use Protocol Buffer (protobuf) definitions to describe services. You can use these protobuf definitions to design a gRPC API in the WSO2 Kubernetes Gateway.
Prerequisites
Before we begin, you’ll need to set up the following in your development environment.
- Docker
- Kubernetes cluster
- Kubectl installed locally
- WSO2 Kubernetes Gateway deployed in your cluster
Once you have the above prerequisites installed, let’s walk through the steps of creating, deploying and invoking a gRPC API securely. And then let's see how to customize OAuth2 authentication, configure rate limiting, enable header modification and enable request response mediation for the gRPC API we just created.
Step 1: Create the backend for the gRPC API
First, let’s start by creating the backend of our gRPC API with the following command.
bash
kubectl apply -f https://raw.githubusercontent.com/wso2/apk/main/developer/tryout/samples/order-sample-backend.yaml -n <namespace>
You can verify the pod has spun up using the following command.
bash
kubectl get pods -n <namespace>

Step 2: Generate the configuration file for the API
In the WSO2 Kubernetes Gateway, the apk-conf file is essentially the API configuration blueprint. It’s a YAML-based file that lets you configure all the necessary details related to a particular API. It can be generated easily by providing the API definition to the config deployer, as explained in the steps given below.
For a gRPC API, the API definition is in the form of .proto files, of which there can be multiple for a single API. In this tutorial, we will be using an API that contains multiple .proto files that have been zipped. You can download the zip folder from here.
Now point to the location of the zip file and generate the apk-conf file using the following command.
bash
curl -k --location 'https://api.example.com:9095/api/configurator/1.3.0/apis/generate-configuration' \
--header 'Host: api.example.com' \
--form 'apiType="GRPC"' \
--form 'definition=@"/Users/user/OrderDefinition.zip"'
The response will contain the configuration file content, which will be saved as SampleService.apk-conf. You can verify the saved content by running the following command.
bash
cat OrderService.apk-conf
The output will appear as follows.
toml
name: "32398767b3b64a7ba1c6aabcd042df4fbd42502a"
basePath: "/grpcapi"
version: "v1"
type: "GRPC"
defaultVersion: false
subscriptionValidation: false
operations:
- target: "order.OrderService"
  verb: "CreateOrder"
  secured: true
  scopes: []
- target: "order.OrderService"
  verb: "ServeOrder"
  secured: true
  scopes: []
- target: "payment.PaymentService"
  verb: "ProcessPayment"
  secured: true
  scopes: []
- target: "user.UserService"
  verb: "GetUser"
  secured: true
  scopes: []
Step 3: Update the apk-conf file with the backend configuration and API details
Save this content into a file with the .apk-conf file extension. You will need to fill in the name and endpoint configuration fields before deploying the API. Let’s do the following changes to the generated .apk-conf file.
- Update the API name from the autogenerated value to
OrderServiceAPI. -
Add an endpoint configurations section pointing to the backend we just created as shown below.
toml
endpointConfigurations:
    production:
        - endpoint: "http://order-backend:6566"
Now the
.apk-conffile will be as follows.toml name: "OrderServiceAPI" basePath: "/grpcapi" version: "v1" type: "GRPC" defaultVersion: false subscriptionValidation: false endpointConfigurations: production: - endpoint: "http://order-backend:6566" operations: - target: "order.OrderService" verb: "CreateOrder" secured: true scopes: [] - target: "order.OrderService" verb: "ServeOrder" secured: true scopes: [] - target: "payment.PaymentService" verb: "ProcessPayment" secured: true scopes: [] - target: "user.UserService" verb: "GetUser" secured: true scopes: []
Step 4: Deploy the API
Generate an access token
First, we need a valid access token issued by an identity provider (IdP). You can use the command below to get an access token from the inbuilt non-production IdP included in the WSO2 Kubernetes Gateway installation.
bash
curl -k --location 'https://idp.example.com:9095/oauth2/token' \
--header 'Host: idp.example.com' \
--header 'Authorization: Basic NDVmMWM1YzgtYTkyZS0xMWVkLWFmYTEtMDI0MmFjMTIwMDAyOjRmYmQ2MmVjLWE5MmUtMTFlZC1hZmExLTAyNDJhYzEyMDAwMg==' \
--header 'Content-Type: application/x-www-form-urlencoded' \
--data-urlencode 'grant_type=client_credentials' \
--data-urlencode 'scope=apk:api_create'
Deploy API
Now, let’s use the API definition proto files and the updated apk-conf file to deploy the API. Replace the ACCESS_TOKEN string given below with the value you obtained in the previous step. Additionally, point to the locations of the apk-conf file and the proto file zipped folder as well.
bash
curl -k --location 'https://api.example.com:9095/api/deployer/1.3.0/apis/deploy' \
--header 'Host: api.example.com' \
--header 'Authorization: Bearer ACCESS_TOKEN \
--form 'apkConfiguration=@"/Users/user/Order.apk-conf"' \
--form 'definitionFile=@"/Users/user/OrderDefinition.zip"'
You can check if the API has been successfully deployed by using the following command.
bash
kubectl get apis -n <namespace>
Step 5: Invoke the API
Once your gRPC API has been deployed, you can invoke it either via Postman, a custom client, or the grpcurl command-line tool. You can download the grpcurl tool from here. Code for custom clients can be generated by providing the modified proto file to the Protocol buffer Compiler.
Generate an access token and invoke the sample gRPC call for the OrderServiceAPI provided below.
bash
grpcurl -insecure \
-import-path /Users/User/proto-files \
-proto common.proto \
-proto user.proto \
-proto payment.proto \
-proto order.proto \
-d '{"id": "1"}' \
-H 'Authorization: Bearer ACCESS_TOKEN' \
default.gw.example.com:9095 grpcapi.v1.user.UserService/GetUser
You will get the following response.
bash
{
"user": {
"id": "1",
"name": "John Doe",
"email": "[email protected]"
}
}
Now you have successfully created, deployed and invoked a gRPC API. Next we will look at how to add more protection and enhance the capabilities of the API as follows.
- Customizing OAuth2 authentication for a gRPC API
- Configure rate-limiting for a gRPC API
- Enable header modification for a gRPC API
- Enable request and response mediation for a gRPC API
Customizing OAuth2 authentication for a gRPC API
OAuth2 ensures only trusted clients with a valid access token can call your API. By default, OAuth2 is enabled for all APIs and the gateway expects the token in the Authorization header. You only need to add an authentication section (as shown below) if you want to change the header name or behavior.
a. To customize the header name and allow the token to pass to the backend, modify the authentication section in the apk-conf file as follows. Let’s switch the header name to X-Api-Auth.
toml
authentication:
- authType: OAuth2
headerName: X-Api-Auth
sendTokenToUpstream: true
Sample apk-conf with the above change
toml
name: "OrderServiceAPI"
basePath: "/grpcapi"
version: "v1"
type: "GRPC"
defaultVersion: false
subscriptionValidation: false
endpointConfigurations:
    production:
        - endpoint: "http://order-backend:6566"
operations:
- target: "order.OrderService"
    verb: "CreateOrder"
    secured: true
    scopes: []
- target: "order.OrderService"
    verb: "ServeOrder"
    secured: true
    scopes: []
- target: "payment.PaymentService"
    verb: "ProcessPayment"
    secured: true
    scopes: []
- target: "user.UserService"
    verb: "GetUser"
    secured: true
    scopes: []
# Customize OAuth2 header handling (optional; OAuth2 is on by default)
authentication:
- authType: OAuth2
headerName: X-Api-Auth # default; change if you like
sendTokenToUpstream: true # forwards the token to the backend
b. Redeploy the API using the following command that we used previously to deploy the API.
bash
curl -k --location 'https://api.example.com:9095/api/deployer/1.3.0/apis/deploy' \
--header 'Host: api.example.com' \
--header 'Authorization: Bearer ACCESS_TOKEN \
--form 'apkConfiguration=@"/Users/user/Order.apk-conf"' \
--form 'definitionFile=@"/Users/user/OrderDefinition.zip"'
c. Invoke the API, this time with the X-API-Auth header instead of the Authorization header.
bash
grpcurl -insecure \
-import-path /Users/User/proto-files \
-proto common.proto \
-proto user.proto \
-proto payment.proto \
-proto order.proto \
-d '{"id":"1"}' \
-H 'X-Api-Auth: Bearer ACCESS_TOKEN' \
default.gw.example.com:9095 grpcapi.v1.user.UserService/GetUser
Configure rate-limiting for a gRPC API
Rate Limiting allows you to limit the number of successful hits to an API during a given period, typically in cases such as the following
- To protect your APIs from common types of security attacks such as certain types of denial of service (DoS) attacks.
- To regulate traffic according to infrastructure availability.
- To make an API or a resource available to a consumer at different levels of the service, usually for monetization purposes.
To add rate limiting to a gRPC API, add the following section in the apk-conf file.
bash
rateLimit:
requestsPerUnit: 10
unit: "Minute"
a. You can configure it from either the API level or resource level as follows.
```toml name: "OrderServiceAPI" basePath: "/grpcapi" version: "v1" type: "GRPC" defaultVersion: false subscriptionValidation: false endpointConfigurations: production: - endpoint: "http://order-backend:6566" operations: - target: "order.OrderService" verb: "CreateOrder" secured: true scopes: [] - target: "order.OrderService" verb: "ServeOrder" secured: true scopes: [] - target: "payment.PaymentService" verb: "ProcessPayment" secured: true scopes: [] # This rate limiting configuration applies for this resource only # It overrides the rate limit set at API level rateLimit: requestsPerUnit: 5 unit: "Minute" - target: "user.UserService" verb: "GetUser" secured: true scopes: []
This rate limiting configuration applies for the entire API
rateLimit: requestsPerUnit: 10 unit: "Minute" ```
b. Now, let’s redeploy the API using the following command that we used previously to deploy the API
bash
curl -k --location 'https://api.example.com:9095/api/deployer/1.3.0/apis/deploy' \
--header 'Host: api.example.com' \
--header 'Authorization: Bearer ACCESS_TOKEN \
--form 'apkConfiguration=@"/Users/user/Order.apk-conf"' \
--form 'definitionFile=@"/Users/user/OrderDefinition.zip"'
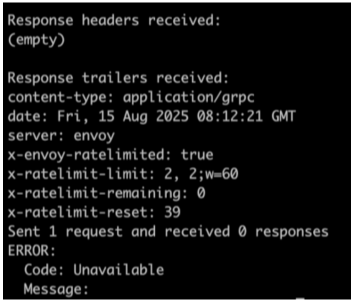
c. Now let’s invoke the API and note how it gets rate limited out
Enable header modification for a gRPC API
WSO2 Kubernetes Gateway lets you change headers per operation or for the whole API using built-in policies.
AddHeader— add a headerSetHeader— update/overwrite a header’s valueRemoveHeader— strip a header
You can place these under either operationPolicies (per endpoint) or apiPolicies (API-wide). For example, adding the following section adds a header named X-Debug with the value True for all responses returned from the backend when the API is invoked.
toml
apiPolicies:
response:
- policyName: AddHeader
policyVersion: v1
parameters:
headerName: "X-Debug"
headerValue: "True"
a. Let’s add that section to our apk-conf file for the OrderServiceAPI.
toml
name: "OrderServiceAPI"
basePath: "/grpcapi"
version: "v1"
type: "GRPC"
defaultVersion: false
subscriptionValidation: false
endpointConfigurations:
production:
- endpoint: "http://order-backend:6566"
operations:
- target: "order.OrderService"
verb: "CreateOrder"
secured: true
scopes: []
- target: "order.OrderService"
verb: "ServeOrder"
secured: true
scopes: []
- target: "payment.PaymentService"
verb: "ProcessPayment"
secured: true
scopes: []
- target: "user.UserService"
verb: "GetUser"
secured: true
scopes: []
apiPolicies:
response:
- policyName: AddHeader
policyVersion: v1
parameters:
headerName: "X-Debug"
headerValue: "True"
b. Now, let’s redeploy the API using the following command that we used previously to deploy the API.
bash
curl -k --location 'https://api.example.com:9095/api/deployer/1.3.0/apis/deploy' \
--header 'Host: api.example.com' \
--header 'Authorization: Bearer ACCESS_TOKEN \
--form 'apkConfiguration=@"/Users/user/Order.apk-conf"' \
--form 'definitionFile=@"/Users/user/OrderDefinition.zip"'
c. Generate an access token to invoke the API using the following command.
bash
curl -k --location 'https://idp.example.com:9095/oauth2/token' \
--header 'Host: idp.example.com' \
--header 'Authorization: Basic NDVmMWM1YzgtYTkyZS0xMWVkLWFmYTEtMDI0MmFjMTIwMDAyOjRmYmQ2MmVjLWE5MmUtMTFlZC1hZmExLTAyNDJhYzEyMDAwMg==' \
--header 'Content-Type: application/x-www-form-urlencoded' \
--data-urlencode 'grant_type=client_credentials' \
--data-urlencode 'scope=apk:api_create'
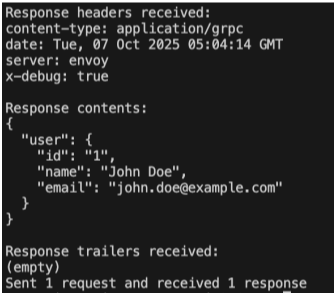
d. Invoke the API and see the added header in the response.
bash
grpcurl -insecure \
-import-path /Users/User/proto-files \
-proto common.proto \
-proto user.proto \
-proto payment.proto \
-proto order.proto \
-d '{"id": "1"}' \
-H 'Authorization: Bearer ACCESS_TOKEN' \
default.gw.example.com:9095 grpcapi.v1.user.UserService/GetUser
Enable request and response mediation for a gRPC API
In this tutorial, we will be adding mediation for gRPC APIs with Interceptor services in Kubernetes Gateway.
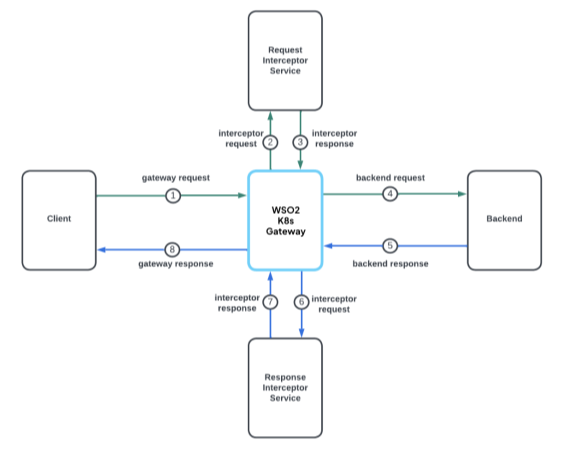
Interceptor configurations can be used to carry out transformations and mediation on the requests and responses. Request interceptor gets triggered before sending the request to the backend. Response interceptor gets triggered before responding to the client. Here, an interceptor is a separate microservice that handles the request, response, or both request and response transformations.
The following diagram demonstrates the flow for a request with both request and response mediation.
The following steps will show you how to setup an interceptor service to carry out the required transformations for requests and responses.
- Implement an interceptor microservice that follows the Interceptor OpenAPI (request/response hooks & payload shape). You can write it in any language.
- Expose it in Kubernetes (Service/Deployment).
- Register it with WSO2 Kubernetes Gateway by providing the service’s URL to the
apk-conffile.
Sample Interceptor Service
You can create a sample interceptor service using the following file. ```toml apiVersion: dp.wso2.com/v1alpha2 kind: APIPolicy metadata: name: order-api-policy spec: override: requestInterceptors: - name: req-interceptor-service responseInterceptors: - name: res-interceptor-service targetRef: group: dp.wso2.com kind: Gateway name: wso2-apk-default
apiVersion: dp.wso2.com/v1alpha1 kind: InterceptorService metadata: name: req-interceptor-service spec: backendRef: name: interceptor-backend # Replace this with your interceptor service includes: - request_body - request_headers - invocation_context
apiVersion: dp.wso2.com/v1alpha1 kind: InterceptorService metadata: name: res-interceptor-service spec: backendRef: name: interceptor-backend # Replace this with your interceptor service includes: - response_headers - response_body - invocation_context ```